Calendar
Overview
Levart’s Admin Calendar allows you control inventory and rate availability.
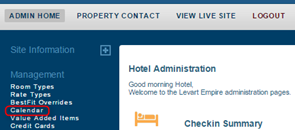
To go to your Calendar, click Calendar under the Management heading
Quick Tips
Control/Shift keys
Like an Excel spreadsheet, Levart’s Calendar allows you select multiple dates by using Control or Shift click functions.
- Holding the Shift key whilst clicking elsewhere on that property, room or rate line will extend the current selection to include adjacent cells.
- Holding the Control key whilst clicking other cells within the calendar will add the clicked cells to the current selection.
Note
You may not be able to perform actions on all selections, eg setting a rate on a selection that includes a derived rate.
Hover
Hover over any room, rate, date or control panel feature for an explanation of that cell.
Live Updates
Levart’s Calendar will display updates on screen any time a booking, cancellation or change has been made that would affect the calendar. Changes will update in your Calendar view automatically, so you will always have an accurate display of bookings, rates and inventory.
Date Click
You are able to click the date at the top of the Property, Inventory or Rate level calendar to apply a change to that entire date.
View Panel
The View Panel allows you to select rooms, rates and dates to view
Selection
The Default selection of rooms and rates displayed on the Calendar is those rates you have nominated to appear on your Rate Types page. Any rates hidden from your Rate Types page will not display.
Clicking Selection will allow you to change the rooms and rates displayed on this page.
Property Control
To display Property Control, check the Property Level Controls checkbox on the display panel.
You can use the Select feature to check None, All Rooms and Rates, All Rooms or All Rates.
You can then add or remove rooms or rates from your display selection by checking or unchecking relevant boxes.
You can select/unselect all rates within a room type by clicking the Select All Rates button next to that Room Type name.
Click the – icon to minimize all rates within that room type
The icon will turn into a + which you can click to expand all rates within that room.
You can save your selection to view in the future by clicking the Save icon, entering a name in the textbox and clicking Save Selection
Click View at the bottom of the page to display your selection.
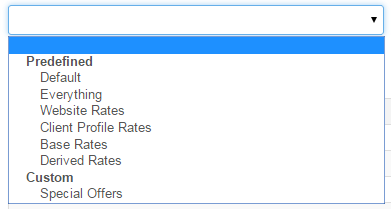
You can also click the dropdown to select from Predefined and Custom lists. These include Default (those rates you have nominated to appear on your Rate Types page), all rates, rates going through to your Booking Engine, Client Profile rates, all Base rates or all Derived rates, and any Custom selections you have saved in the past.
Click the relevant selection and click View.
Date
You are able to control the dates displaying on your Calendar by selecting From and To dates
Alternatively, you can use the Period function to select a period to display. This period begins at the date set in the From date box, and once a new period range is selected, the To date box will automatically update to the relevant date
Click View to display your selections.
User Panel
The User Panel shows you what users currently have the Calendar open. If a user has more than one window open, the user will appear more than once.
When another user makes a change to the Calendar, a popup will appear in the bottom right hand corner advising you that changes that have been made. Bookings and cancellations will immediately update so your Calendar inventory is always accurate.
Legend
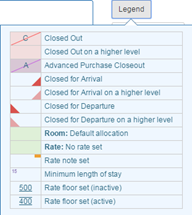
The Legend on the top left corner of the page explains the icons on your Calendar.
Info
You can hover over any icon on your Calendar for further explanation.
Channel Updates
The Channel Updates pop up outlines the capabilities and limitations of the channels you are linked to and explains what happens if you apply a function in Levart that is not available on that channel.
Property, Inventory and Rate Grids
You are able to select multiple rooms, rates and dates simultaneously on the Levart Calendar.
To select specific consecutive dates in Property Control, within the same room in Inventory Control or rate in Rate Control, simply click the relevant start date, hold down your Shift key and click the relevant end date. All dates within that period will be highlighted, and you can use the control panel to apply changes.
To select specific dates across room or rate types, click on a date and hold the Control key while selecting other dates. There is no limit to the number of dates you can select. All dates you have selected will be highlighted, and you can use the control panel to apply changes.
Property Control
Property Level Controls allow you to set Close Outs, Closed for Arrival and Closed for Departure functions on a property level.
Global Change (GC)
Global Change functionality allows you to apply multiple changes to your property for specific days in your current calendar.
Once you check the GC checkbox, the Inventory Panel will display days. Check the relevant days and click Select
This will highlight only the days you have checked on the calendar dates you have open. You can then apply relevant Close Out, Open, CA or CD functions to all of those selected dates.
Close Out
To close out your property for a date, click on that particular date (or multiple dates utilising the Global Change or Control/Shift click functions), then click the Close Out box to apply a Close Out. This will apply a stop sell to that Room Type for that date.
Note
Please allow 20 minutes for a Close Out to sync through to all channels.
Open
To lift a Property Level Close Out, click on the relevant date or dates and click Open on the Property Level Control Panel.
Closed for Arrivals (CA)
Click on a particular date (or multiple dates utilising the Global Change or Control/Shift click functions) and then click CA to apply a Closed for Arrival Close Out for all Room Types on that particular date. This will mean that guests will be unable to check in on that date, but will be able to book a stay with a check-in before that date and stay through.
This will be indicated with a CA icon on the bottom right hand corner of that date.
You can remove a Closed for Arrivals Close Out by clicking on the relevant date, and clicking CA again.
Note
Some channels do not accept Closed for Arrivals updates. Please refer to Channel Updates on the top right hand corner of the page for specific channel information.
Closed for Departures (CD)
Click on a particular date (or multiple dates utilising the Global Change or Control/Shift click functions) and then click CD to apply a Closed for Departure Close Out for all Room Types on that particular date. This will mean that guests will be unable to check out on that date, but will be able to book a stay with a check-out after that date and stay through.
This will be indicated with a CD icon on the bottom right hand corner of that date.
You can remove a Closed for Departures Close Out by clicking on the relevant date, and clicking CD again.
Note
Some channels do not accept Closed for Departures updates. Please refer to Channel Updates on the top right hand corner of the page for specific channel information.
Save Changes
Click Save Changes on the right of the Control Panel to update your Calendar. This will save any changes made on any level of your calendar.
Note
Please allow up to a half hour for a close out to sync through to all channels.
Inventory Control
The Inventory Control Calendar is where you set up and control your entire room level inventory. Here you can update room availability, close out specific rooms on specific dates and apply Closed for Arrival and Closed for Departure functions on a room level, as well as apply Distribution Control by Day to your channels.
Filter By Channel
You can view rooms linked to specific channels by selecting that channel from the Filter by Channel dropdown. Select the relevant channel and all Room Types currently linked to that channel will display.
Room Information
Hover over a Room Type to view specific room details, including Maximum Guests, Default Allocation, Alert Quantity and when the last booking for that room was made.
Click on the room name to be taken to the Room Types page for that room. You can update Room Code, Allocation Quantity, Alert Quantity and Bedding Options on this page.
Open Channel
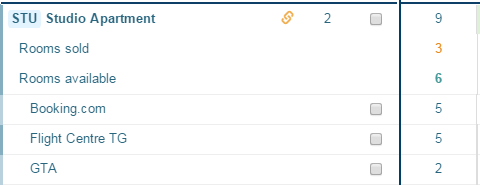
A Link Icon appears next to all rooms that are linked to a channel in Channel Control. You can click this icon next to that Room Type to view the inventory going through to each channel for any given day. This includes overrides set on the Distribution Control page.
Hover over any channel date to view specific override information.
Click the Link Icon again to hide channels.
Distribution Control by Date
You are able to manage inventory distribution to channels by date in your Calendar. This is an invaluable tool to ensure you are directing last room traffic to your website, and allows you to control how many rooms you can hold for just your Booking Engine bookings for certain peak periods.
Click the link icon next to the relevant Room Type to display all channels linked to that room.
Click on the relevant channel and date, or utilise Global Change or Control/Shift click functions to select multiple dates, and then click Dist Control to update your distribution options for these dates.
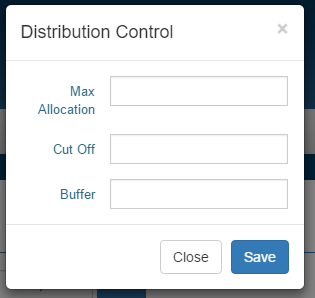
A popup will appear allowing you to set Max Allocation, Cut Off, and Buffer fields. You can fill in as many or as few of these fields as you would like.
Why use Distribution Control?
| Distribution Setting | Action |
|---|---|
| Max Allocation | The Max Allocation field allows you to control the maximum number of rooms to send to a channel at any one time. This does not control the number of rooms bookable by the channel overall. It simply controls the number of channels bookable at any one time. Why use this? This function is useful on channels where the number of rooms is displayed to the booker. It allows you to create a sense of urgency in booking on channels where a "hurry" alert is activated when rooms are low. It is also useful if you wish to reduce the number of multiple room bookings made on a specific channel at any one time. |
| Cut Off | Previously known as Min Inventory - this field allows you to direct bookings to your own Booking Engine. Setting a value in Cut Off will ensure this channel will receive no inventory when inventory dips below this level. As it is the cut off point for a channel - you cannot set this field to 1. Setting this field to 2 will mean that this channel will get 2 rooms inventory when you have 2 rooms available, however will receive 0 inventory when you have one room available. Why use this? Levart recommends you setting this across all channels. If you set it to 3, this will mean that your last two rooms will be directed to your own Booking Engine on busy days, avoiding unnecessary commission on days you will sell out anyway. It also helps avoid overbookings, as only your Booking Engine has access to your last room inventory. You can set this on most channels, and leave some open - directing the last room inventory to both your Booking Engine and a low commission channel if you wish. |
| Buffer | The Buffer field allows you to hold a nominated number of rooms from a channel. You are able to set a buffer on your PMS if linked to Levart, which will hold rooms from going to your Booking Engine and channels. This is controlled via the Distribution Control page. Why use this? Inventory to that channel is immediately reduced, as opposed to the Cut Off field, where inventory is only removed from a channel when your inventory gets to a certain level. |
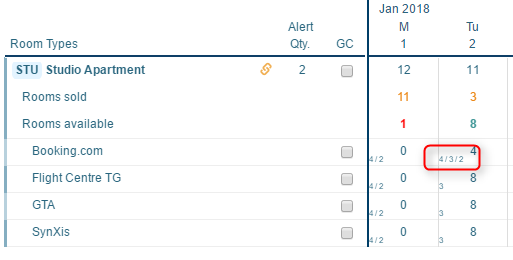
Once you have saved your Dist Control settings, they will appear on the bottom left corner of the relevant channel and date grid square.
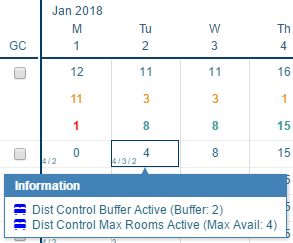
You can hover over any date to see what exact Distribution Control settings are being applied to equal that value. This will only show active fields:
As you can see above, all three Dist Control fields have a value - as indicated by the three numbers in the grid square, however only two are active at this time, as the Cut Off is 3 and room inventory has not dipped below 2 at this point.
You can view and edit all distribution settings by room and channel by going to Distribution Control under the Management heading.
Click Save Changes to update and save your changes.
Alert Quantity
The Alert Quantity column displays the Alert Quantity set on the Room Types page. When availability for any date in this room type reaches that number, a warning email will be sent to you.
Global Change (GC)
Global Change functionality allows you to apply multiple changes to one or multiple room types for specific days in your current calendar.
Once you check the GC checkbox, the Inventory Panel will display days. Check the relevant days and click Select
This will highlight only the days you have checked for that room type on the calendar dates you have open. You can then apply relevant Allocation, Available, Close Out, CA or CD functions to all of those selected dates.
Allocation / Set Allocation
The top row of inventory next to each Room Type on your Inventory Calendar indicates the Room Allocation value for that particular date. This indicates the total number of rooms including rooms already sold.
You can change your Room Allocation by clicking the Allocation Value on the relevant date, entering a value in the box on the panel and clicking Set Allocation.
If the value you set is lower than the number of rooms booked, this room will not be bookable.
Note
If you use a Property Management System, inventory changes made to your Calendar may be overwritten by your PMS at the next full sync.
Rooms Sold
The middle row of inventory next to each Room Type in your Inventory Calendar indicates the number of rooms sold for that particular date. This only displays bookings made or imported into Levart.
You can click on the Rooms Sold number on any particular date to view the bookings made for that date, and the source of those bookings.
Rooms Available/Set Available
The bottom row of inventory next to each Room Type on your Inventory Calendar indicates the number of rooms available for that particular date. This is indicates the total number of rooms bookable.
You can change your Rooms Available by clicking the Allocation Value on the relevant date, entering a value in the box on the panel and clicking Set Available.
The Rooms Available row will update to display that number of rooms bookable, and the Rooms Available row will update to the correct figure, which includes the number of rooms available, and the number of rooms sold.
Once your Alert Quantity has been reached, the Rooms Available value will appear in red.
Note
If you use a Property Management System, any inventory changes made to your Calendar may be overwritten by your PMS at the next full sync.
Date
You are able to click the date at the top of Inventory Control to apply a change to all Rooms Types for that entire date.
Close Out
To close out a Room Type for a date, click on that particular date (or multiple dates utilising the Global Change or Control/Shift click functions), then click the Close Out box to apply a Close Out. This will apply a stop sell to that Room Type for that date.
This will remove the Rooms Available row, as no rooms will be bookable. You can still view existing bookings for that date by clicking Rooms Sold.
In order to open a room you have previously closed out, you will need to click on the relevant date and enter a value, then click Set Allocation or Set Available.
You can apply a Close Out to a specific channel by clicking the Link icon next to the Room Type, and clicking on a particular date (or multiple dates utilising the Global Change or Control/Shift click functions), for a particular channel, then click the Close Out box to apply a Close Out. To remove a Close Out from a specific channel, click on that specific date, and then click Open.
Note
Please allow up to a half hour for a close out to sync through to your channels.
Default
Click on a particular date (or multiple dates utilising the Global Change or Control/Shift click functions) and then click Default to set the Allocation amount to the default amount from your Room Types page. This will set the Room Allocation row to that amount, and indicate that it is the default amount with a green square.
Your Rooms Available column will be the number of rooms set, minus the number of rooms sold, so if your Default Allocation is less than the number of rooms sold, this room will not be bookable.
Open
Click on a particular date (or multiple dates utilising the Global Change or Control/Shift click functions) that is closed out and then click Open to set the Allocation amount to the number of rooms available prior to you closing this room type out.
You can also perform this on a channel room level if you have applied a close out directly on a channel. Simply click the link icon next to the relevant room type, select the specific date and click Open.
Closed for Arrivals (CA)
Click on a particular date (or multiple dates utilising the Global Change or Control/Shift click functions) and then click CA to apply a Closed for Arrival Close Out for that room type on that particular date. This will mean that guests will be unable to check in on that date, but will be able to book a stay with a check-in before that date and stay through.
This will be indicated with a CA icon on the bottom right hand corner of that date.
You can remove a Closed for Arrivals Close Out by clicking on the relevant date, and clicking CA again.
Note
Some channels do not accept Closed for Arrivals updates. Please refer to Channel Updates on the top right hand corner of the page for specific channel information.
Closed for Departures (CD)
Click on a particular date (or multiple dates utilising the Global Change or Control/Shift click functions) and then click CD to apply a Closed for Departure Close Out for that room type on that particular date. This will mean that guests will be unable to check out on that date, but will be able to book a stay with a check-out after that date and stay through.
This will be indicated with a CD icon on the bottom right hand corner of that date.
You can remove a Closed for Departures Close Out by clicking on the relevant date, and clicking CD again.
Note
Some channels do not accept Closed for Departures updates. Please refer to Channel Updates on the top right hand corner of the page for specific channel information.
Save Changes
Click Save Changes on the right of the Control Panel to update your Calendar. This will save any changes made on any level of your calendar.
Note
Please allow up to a half hour for any changes to sync through to your channels.
Rate Control
Rate Control allows you to update rate pricing, set minimum length of stay by date, apply rate level close outs, add Default Value Proposition by Date of Stay, set channel level overrides, and view specific channel rate details.
Filter By Channel
You can view rates linked to specific channels by selecting that channel from the Filter by Channel dropdown. Select the relevant channel and all Rate Types currently linked to that channel will display.
Rate Click
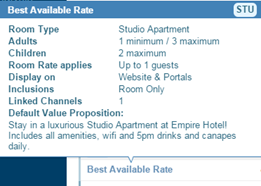
Hover over a Rate Type to view specific rate details, including Maximum Guests, Display details, Inclusions, and Default Value Proposition.
Click on the room name to be taken to the Rate Types page for that rate. You can update all rate details on that page.
Channel Overrides
A Link Icon appears next to all rates that are linked to a channel in Channel Control. You can click this icon next to that Rate Type to view the offers going through to each channel. This includes overrides, Rate Factor and shows you what is going through to a channel. You can hover over any channel and any date to view exactly what Levart is sending to the channel for any day.
Hover over any channel date to view specific override information.
Click the Link Icon again to hide channels.
Channel Overrides - Minimum Length of Stay
To set a MLOSBD on a Rate Type for a specific channel on a specific date, click on that particular date (or multiple dates utilising the Global Change or Control/Shift click functions), enter the relevant MLOS for those dates into the textbox on the Rate Control Panel and click Set MLOS to apply that MLOS override. This can only be applied on channels that accept MLOSBD updates.
Once this has been applied, the updated MLOS for that date will appear in the top left hand corner of that date.
Channel Overrides - Set Floor
You are able to set a minimum value that a channel can receive on particular dates, so that if your rate ever drops below that value, you know that the channel will not get a rate lower. To set a Rate Floor for a specific channel on a specific date, click on that particular date (or multiple dates utilising the Global Change or Control/Shift click functions), enter the amount for those dates into the textbox on the Rate Control Panel and click Set Floor to apply that override.
Once this has been applied, the floor value will appear in the bottom right hand corner of that date, and a line below the value will indicate that a floor has been set, but is not currently in use.
If the rate drops below the floor value, the floor value will remain, and the rate will display with a line above and below the price on that day.
To remove a Rate Floor, select the relevant date, and click Set Floor with nothing entered in the textbox.
Channel Overrides - Close Out
To close out a channel's Rate Type for a date, click on that particular date (or multiple dates utilising the Global Change or Control/Shift click functions), then click the Close Out box to apply a Close Out. This will apply a stop sell to that Rate Type for that channel on that date.
You can lift a close out on a channel by selecting the date or dates, and clicking Open on the Rate Control Panel.
Note
Please allow twenty minutes for overrides to sync through to your channels.
Channel Overrides - Note
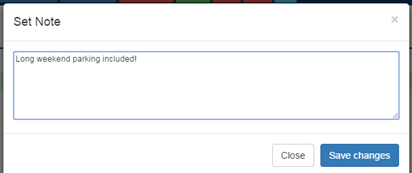
To set a Default Value Proposition override on a channel Rate Type for a date, click on that particular date (or multiple dates utilising the Global Change or Control/Shift click functions), click on Note in the Rate Control Panel and enter the relevant Default Value Proposition into the text box and click Save Changes.
Once this has been applied, dates with Notes added will display an orange rectangle in the top right hand corner.
You can remove a note by clicking on that particular date, clicking Note on the Rate Control Panel and clicking the X icon next to that note.
Channel Overrides - Derive
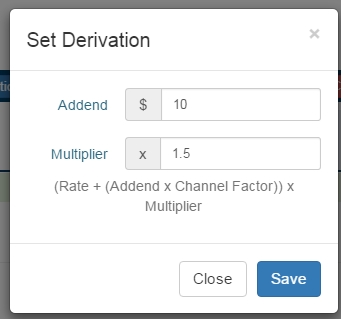
You are able to set a multiplier/addend on a rate for a specific channel on specific dates in order to manipulate the price going through to the channel. To do this, select the particular date (or multiple dates utilising the Global Change or Control/Shift click functions), click Derive on the Rate Control Panel, enter the relevant Addend and/or Multiplier calculations, and click Save.
Once this has been applied, the value of that date will change, and derivation calculations will be indicated on the bottom left of that particular date.
You can remove a derivation override by clicking on that particular date, click Derive on the Rate Control Panel, entering 0 and 1.0 in the Addend and Multiplier boxes respectively, and clicking Save.
Base/Derived Rates
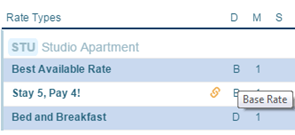
Base Rates are indicated with a B next to them, and Derived rates with a D next to them in the Derived column. Hovering over any Base or Derived rate will highlight it and indicate its Derived and Base rates respectively.
Minimum Length of Stay
A rate’s Minimum Length of Stay is indicated in the M column next to that rate.
Minimum Length of Stay by Day
To set a MLOSBD on a Rate Type for a date, click on that particular date (or multiple dates utilising the Global Change or Control/Shift click functions), enter the relevant MLOS for those dates into the textbox on the Rate Control Panel and click Set MLOS to apply that MLOS override.
Once this has been applied, the updated MLOS for that date will appear in the top left hand corner of that date.
Note
Values with an asterisk next to them indicate that the Only allow multiples of MLOS has been selected and Minimum Length of Stay by Day overrides cannot be applied.
Rate Sell Period
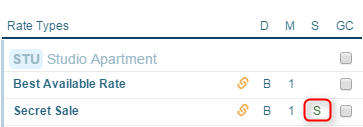
An active Rate Sell Period will be indicated by a green S next to that rate
An inactive Rate Sell Period will be indicated by a red S next to that rate name and a red Close Out on all dates on the Calendar.
Global Change
Global Change functionality allows you to apply multiple changes to one or multiple rate types for specific days in your current calendar.
You can tick the GC checkbox next to the room name to select all rates within that Room Type.
Once you check the GC checkbox, the Inventory Panel will display days. Check the relevant days and click Select
This will highlight only the days you have checked for that rate type on the calendar dates you have open. You can then apply relevant rate, MLOS by Date, Close Out or Note to all of those selected dates.
Set Rate
There are 3 ways you can change the rates in the calendar:
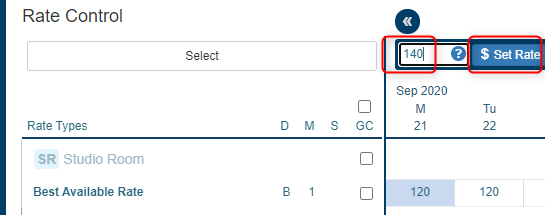
- To set a rate on a Rate Type for a date, click on that particular date (or multiple dates utilising the Global Change or Control/Shift click functions), enter the relevant price for those dates into the textbox on the Rate Control Panel and click Set Rate to set that price.
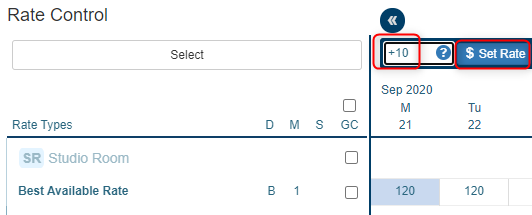
Once this has been applied, the price on the Calendar will change to the price entered in the Set Rate textbox. - To increase or decrease the Rate Type by a dollar amount, click on that particular date (or multiple dates utilising the Global Change or Control/Shift click functions), enter + or - the dollar amount in the textbox and click Set Rate.
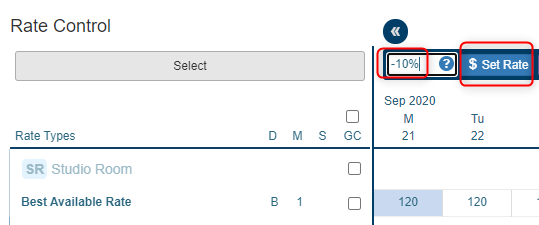
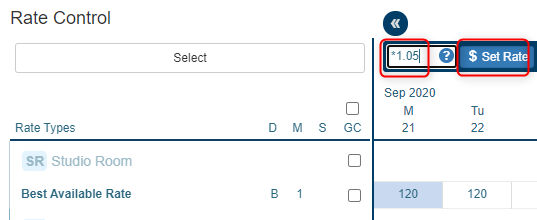
E.g. enter +10 and it will increase the rate/s by $10, or enter -10 and it will decrease the rate/s by $10 - To increase or decrease the Rate Type by a percentage amount, (or multiple dates utilising the Global Change or Control/Shift click functions), in the textbox either:
a) Enter *1.05 to increase the rate by 5% or *0.95 to decrease by 5%
b) Enter +10% to increase the rate by 10% or -10% to decrease by 10%
Close Out
To close out a Rate Type for a date, click on that particular date (or multiple dates utilising the Global Change or Control/Shift click functions), then click the Close Out box to apply a Close Out. This will apply a stop sell to that Rate Type for that date.
Note
Please allow twenty minutes for a Close Out to sync through to your channels.
Open
To lift a Rate Level Close Out, click on the relevant date or dates and click Open on the Rate Level Control Panel.
Clear
To remove the rate value for any given day, you can select that day and click Clear. If you clear a base rate, any rates derived from it will also be cleared and thus not bookable on that date.
Note
To set a Default Value Proposition override on a Rate Type for a date, click on that particular date (or multiple dates utilising the Global Change or Control/Shift click functions), click on Note in the Rate Control Panel and enter the relevant Default Value Proposition into the textbox and click Save Changes.
Once this has been applied, dates with Notes added will display an orange rectangle in the top right hand corner.
You can remove a note by clicking on that particular date, clicking Note on the Rate Control Panel and clicking the X icon next to that note.
Save Changes
Click Save Changes on the right of the Control Panel to update your Calendar. This will save any changes made on any level of your calendar.
Note
Please allow up to a half hour for any changes to sync through to your channels.
